 2. Saving a card Reference
Saving a card
Below you can find the interaction between the application that uses the PiA SDK and the SDK for Saving a card.
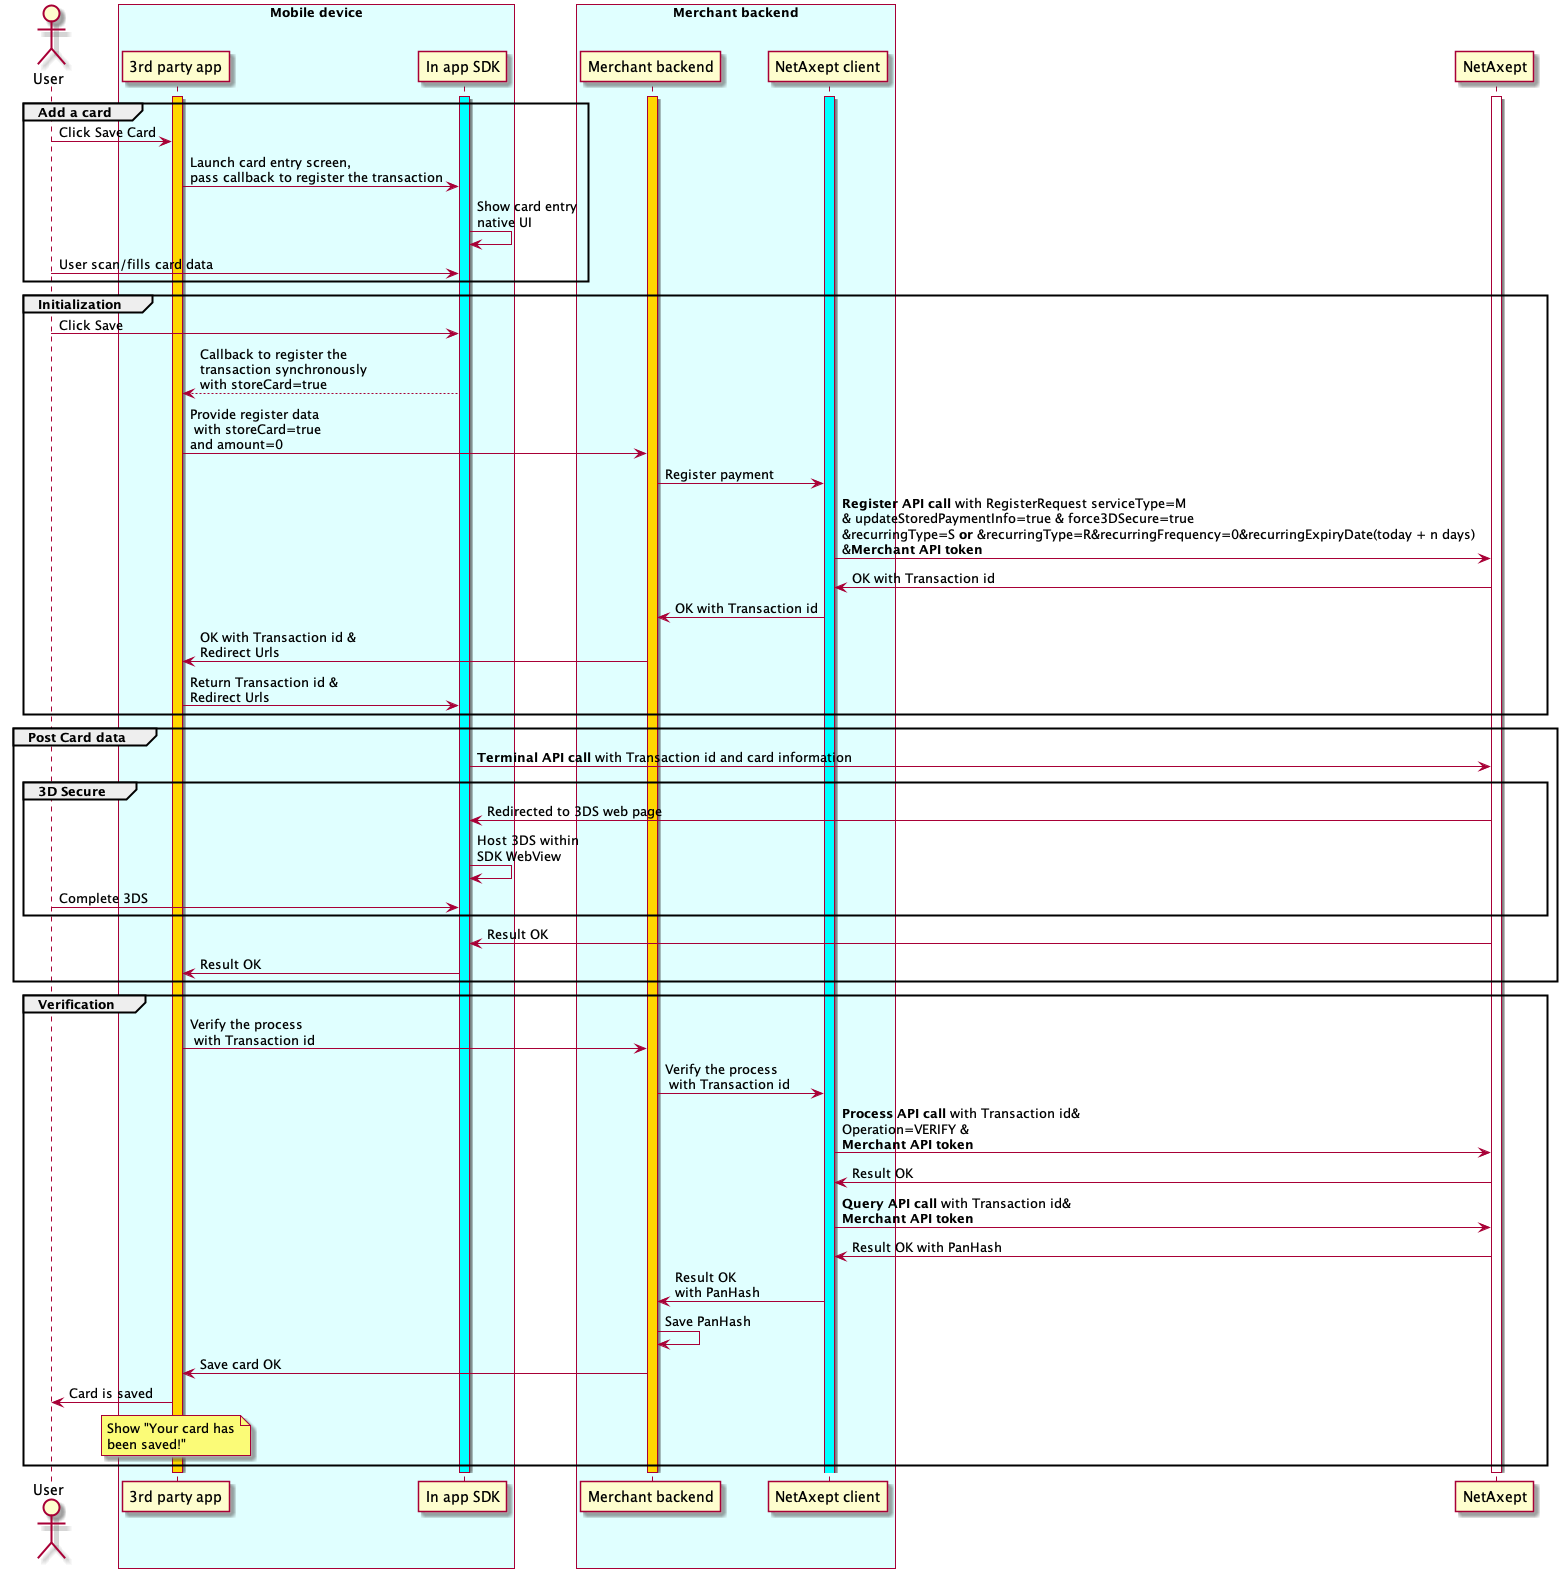
The Save card logic is similar to Basic payment flow, with some small differences:
You can start by creating a PaymentProcess object of type cardStorage.
let cardStorage = PaymentProcess.cardStorage(
    withMerchant: merchantDetails) { [unowned self] callback in
          // Make the registeration call here and retrun the callback
    }
Note: If you do not support certain card schemes that are supported by the SDK, pass an exclude-card-scheme set to exclude the card schemes and present user with “This card is not supported” message during card entry.
// Exclude Amex and Visa from supported card scheme list.
let cardStorage = PaymentProcess.cardStorage(
    withMerchant: merchantDetails,
    excludedCardSchemeSet: [.amex, .visa]) { [unowned self] callback in
           // Make the registeration call here and retrun the callback
     }
Present the controller and handle the callbacks
PiaSDK.controller(
    for: cardStorage,                                     // use cardStorage.sBusiness() for saving a S-Business Card
    success: { piaController, transactionId in  },        // Commit the transaction with your merchant backend
    cancellation: { piaController, transactionId in },    // User canceled, rollback the transaction
    failure: { piaController, error in}                   // Rollback transaction, check error object for detail.
)
The main flow for saving a card:
Scan Credit Card screen is displayed. User can scan the card, to simplify the process, or can proceed to Manual Entry screen. After scanning successfully, user will be prompted to manual entry screen, with the fields pre-populated (card number and expiration date - if were detected by the Card.IO library), to check if the data is valid, and correct if necessary.
User fills the CVV/CVC, and clicks Save Card button.
3D Secure WebView is prompted (3DS authentication is performed unless it has been waived by your chosen card acquirer). Here user can navigate inside this web page, using custom build controls (Back, Forward, Close).
If user closes the webview, user will return to the manual entry page.
After filling the confirmation code in 3D Secure, the user is returned back to the application, with a result code that is handled by the SDK and appropriate callbacks are fired.
Note: Since card scanning functionality requires Camera Permission, the camera usage must be added to Info.plist file in the host application.
Key    :  Privacy - Camera Usage Description
 Value  :  $(PRODUCT_NAME) camera us
For Netaxept Production environment, when saving a card and the 3D Secure process is triggered, this is handled inside the SDK, without storing any information related to the transaction.
The save card process consists in a payment towards Netaxept with 0 (zero) amount. However, when Netaxept processes this request, is forced to use the one major amount of the specific currency (e.g. for EUR currency, the major amount is 1 EUR).
Note: This amount won’t be charged to the user, this is for verifying purpose only due to the requirement from the issuer.
Note: During the process, if users change the camera permission or any of the application’s permissions, the application will be restarted automatically by the system (according to Apple’s policy and security reason).
Netaxept backend integration request body - Saving card for Easy/Recurring Payment
Note: See Netaxept documentation for more details on this API.
Test: https://test.epayment.nets.eu Production: https://epayment.nets.eu Path: /netaxept/register.aspx Method: POST
Request body:
// Saving card for Easy payment
{
    "merchantId" : "integer",
    "token" : "string",
    "orderNumber" : "string",
    "currencyCode" : "string",
    "redirectUrl" : "string",
    "serviceType" : "M",
    "recurringType" : "S",
    "force3DSecure" : "true",
    "updateStoredPaymentInfo" : "true"
}

// Saving card for Recurring payment
{
    "merchantId" : "integer",
    "token" : "string",
    "orderNumber" : "string",
    "currencyCode" : "string",
    "redirectUrl" : "string",
    "serviceType" : "M",
    "recurringType" : "R",
    "recurringExpiryDate" : "YYYYMMDD",
    "recurringFrequency" : "integer",
    "force3DSecure" : "true",
    "updateStoredPaymentInfo" : "true"
}
Netaxept returns transaction ID following the above register call. In order to store the card, make a verify API call to Netaxept with the given transaction ID.
(Query the status of the register call with Netaxept to retreive and store the Pan-hash associated with the card)
Test: https://test.epayment.nets.eu Production: https://epayment.nets.eu Path: /netaxept/process.aspx Method: POST
Request body:
{
    "merchantId" : "string",
    "token" : "string",
    "transactionId" : "string",
    "operation" : "VERIFY"
}
Use the query API to fetch the Pan Hash associated with the card once process VERIFY is successful.
Query transaction status
Test: https://test.epayment.nets.eu Production: https://epayment.nets.eu Path: /netaxept/query.aspx Method: POST
Request body:
{
    "merchantId" : "string",
    "token" : "string",
    "transactionId" : "string"
}
Note: See Netaxept documentation for more details on this API.
Note: Netaxept backend integration tips can be found in 5.4 Backend Tips, Easy/Recurring Payment section